Difference between revisions of "Bedlam"
(New page: Bedlam is a dungeon in the facet of Malas that was introduced with the Mondain's Legacy expansion. Bedlam is accessed by double-clicking the iron maiden in the healer's sh...) |
|||
| Line 1: | Line 1: | ||
| − | + | [[Image:mapBedlamUOAM.gif]] | |
| + | [[Image:mapBedlam.gif]] | ||
| + | [[Image:mapBedlam1.gif]] | ||
| + | {{tocright}} | ||
| + | === Summary === | ||
| + | * Malas - 21-53’ North 53-9’ | ||
| + | * The start of the quest from [[Aernya_Mistress_of_Admissions]] is necessary to enter. | ||
| + | * There is a second level to this dungeon which contains a champion spawn. Go to the graveyard west of the entrance and there is a tomb which takes you down stairs. | ||
| − | |||
| − | + | === Creatures === | |
| + | * The [[Red Death]] is one of the creatures you must kill as part of the [[Tuition Reimbursement]] quest. On its corpse you will also find [[Resolve's Bridle]] which can be returned to [[Kia the Student]] in a separate quest. The Red Death is a powerful magic user and runs very fast. It is not very difficult to kill however. A single mage can wear it down over a space of time, or it can be killed very quickly by a group of 3 players. | ||
| + | * There is a peerless monster which can be summoned in Bedlam. It is called the [[Monstrous Interred Grizzle]]. By talking to [[Master Cohenn the Librarian]] you can start the quest for the [[Librarian's Key]], which can be used to gain access to the Grizzle for your party of adventurers. | ||
| − | + | http://images.uostuff.com/images/creatureRedDeath.gif | |
| + | |||
| + | === Tips for Survival === | ||
| + | * Red Death and the other named monsters are immune to the effects of [[Ethereal Voyage]] | ||
| + | * [[Area Peace]] is your friend. [[Orange petal]]s, too. | ||
| + | * A well-trained [[Cu Sidhe]] is capable of killing any of the named monsters. However, the random spawn of assorted [[undead]] critters makes it somewhat challenging. The [[tamer]] trick of standing on the same tile as your pet is less effective when the undead spellcasters use Necro area spells. Red Death is solo-able by a tamer with a Cu Sidhe and area peace. Recommend heavy use of [[Gift of Renewal]] and [[Nature's Fury]] to take some of the heat off your pet. | ||
| + | * If you are targeted by an overwhelming number of monsters, run for the exit. Re-enter the dungeon and try not to move - occasionally, the monsters act as though they cannot see you for several moments, usually enough for you to regain control. | ||
| + | * Don't be fooled by the cemetery gate. The named monsters on the other side of that fence can open in, teleport past it, or cast on you from inside. | ||
| + | |||
| + | === The Bedlam Peerless === | ||
| + | * The keys to the Bedlam Peerless are "[[disintegrating thesis note]]s." They look like mage spell scrolls [[Image:Uostuff_griz_notes.gif]]. Like all Peerless keys, they have a timer. Their timer is far shorter than average for [[Peerless Key]]s, however. | ||
| + | * There are 5 thesis notes. They are found on any "named" Undead in Bedlam, except for Red Death. These named undead are difficult to defeat, but have good loot and are rumored to have great chances at dropping the higher end set pieces. | ||
| + | * It is common for it to take so long to find the 5th note that, by the time you do, the 1st has decayed. | ||
| + | * The notes are exchanged for the [[Librarian's Key]] [[Image:Uostuff_griz_cohen_book.gif]] via [[Master Cohenn]]'s quest, called "Misplaced." The reward for that quest, the Librarian's Key, is what's used to enter the Peerless Room. | ||
| + | * To enter the peerless room you must exchange the [[Librarian's Key]] for three smaller keys. This is done by dropping the [[Librarian's Key]] on the key table. The key table is found inside the house, which is found in the north western corner of Bedlam. 2 x click one of the smaller keys to teleport you and your party to the peerless room. | ||
| + | * The Peerless, the [[Monstrous Interred Grizzle]], is of moderate difficulty. Like its younger cousins found at the [[Palace of Paroxysmus]] and at the [[Bedlam Crypt]] Champ Spawn (see below) it destroys equipment with an "[[infernal ooze]]" (Does massive damage to equipment until its durability is in the single digits, then does normal equipment damage.) | ||
| + | * [[Mage]]s should rely upon [[Earthquak]]e spells and summoned [[Earth Elemental]]s. [[Dexer]]s can fight it, but it is very difficult and involves a lot of jousting. Be sure to not charge right through the puddles of infernal ooze. You will die. | ||
| + | * [[Pet]]s can do pretty well. Most [[tamer]]s that I've seen use [[Cu Sidhe]]s against it, and tend to rely upon [[greater heal]] spells rather than the [[Vet]] skill. This is probably because standing next to the pet and healing it from there is a very good way to get hit by the infernal ooze and die. | ||
| + | * In the way of special loot, the Grizzle spawns the [[Grizzled Mare]] (a Hellsteed that bonds to you instantly), the [[grizzled bones]] (See [[Rare Ingredients]]), the [[Tombstone of the Damned]] (See [[Named and Peerless Loot]]), and a special [[set]] of bone armor: the [[grizzled set]]. | ||
| + | |||
| + | === Information on the Bedlam Crypt Champ Spawn === | ||
| + | |||
| + | Level 1: plague spawn, boglings | ||
| + | |||
| + | Level 2: plague beasts, bog things | ||
| + | |||
| + | level 3: plague beast lords, interred grizzles (same that spawn in the Palace of Paroxysmus) | ||
| + | |||
| + | level 4: fetid essences (same that spawn with the Prism of Light Peerless), "pestilant bandages" (new creature i think; looks very similar to a mummy, can take somewhat more damage, couldn't tell what kind of damage they do becuase we dropped them so fast) | ||
| + | |||
| + | Champ: Ilhenir the Stained. | ||
| + | |||
| + | He was lored by a member of our party: | ||
| + | |||
| + | Ilhenir the Stained | ||
| + | 9000 Hp 1264 STR | ||
| + | 134 Stam/ DEX | ||
| + | 644 mana/INT | ||
| + | |||
| + | Wrestling 119.9 | ||
| + | Tactics 119.9 | ||
| + | Resist 120.0 | ||
| + | Anat 117.5 | ||
| + | Poisoning 5.4 | ||
| + | Magery 100.0 | ||
| + | Eval 100.0 | ||
| + | |||
| + | Physically, it's kind of a paragon grizzle. Looks similar, has that equipment attack. Hits fairly hard. | ||
| + | |||
| + | 14 or 15 screencaps located here from the LS group that first completed the Champ on Jan 9th, 2006: | ||
| + | |||
| + | http://uols.net/forum/album_cat.php?cat_id=3 | ||
| + | |||
| + | [[Category:Dungeons]] | ||
Revision as of 11:17, 31 December 2007
Summary
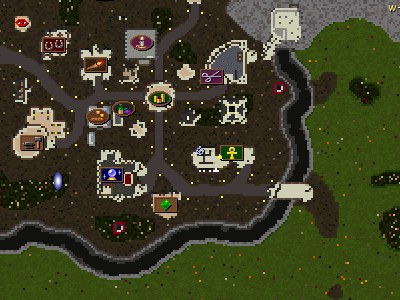
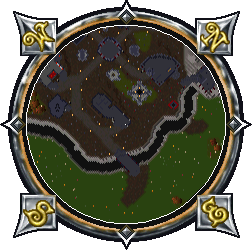
- Malas - 21-53’ North 53-9’
- The start of the quest from Aernya_Mistress_of_Admissions is necessary to enter.
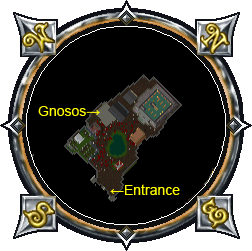
- There is a second level to this dungeon which contains a champion spawn. Go to the graveyard west of the entrance and there is a tomb which takes you down stairs.
Creatures
- The Red Death is one of the creatures you must kill as part of the Tuition Reimbursement quest. On its corpse you will also find Resolve's Bridle which can be returned to Kia the Student in a separate quest. The Red Death is a powerful magic user and runs very fast. It is not very difficult to kill however. A single mage can wear it down over a space of time, or it can be killed very quickly by a group of 3 players.
- There is a peerless monster which can be summoned in Bedlam. It is called the Monstrous Interred Grizzle. By talking to Master Cohenn the Librarian you can start the quest for the Librarian's Key, which can be used to gain access to the Grizzle for your party of adventurers.
http://images.uostuff.com/images/creatureRedDeath.gif
Tips for Survival
- Red Death and the other named monsters are immune to the effects of Ethereal Voyage
- Area Peace is your friend. Orange petals, too.
- A well-trained Cu Sidhe is capable of killing any of the named monsters. However, the random spawn of assorted undead critters makes it somewhat challenging. The tamer trick of standing on the same tile as your pet is less effective when the undead spellcasters use Necro area spells. Red Death is solo-able by a tamer with a Cu Sidhe and area peace. Recommend heavy use of Gift of Renewal and Nature's Fury to take some of the heat off your pet.
- If you are targeted by an overwhelming number of monsters, run for the exit. Re-enter the dungeon and try not to move - occasionally, the monsters act as though they cannot see you for several moments, usually enough for you to regain control.
- Don't be fooled by the cemetery gate. The named monsters on the other side of that fence can open in, teleport past it, or cast on you from inside.
The Bedlam Peerless
- The keys to the Bedlam Peerless are "disintegrating thesis notes." They look like mage spell scrolls
 . Like all Peerless keys, they have a timer. Their timer is far shorter than average for Peerless Keys, however.
 - There are 5 thesis notes. They are found on any "named" Undead in Bedlam, except for Red Death. These named undead are difficult to defeat, but have good loot and are rumored to have great chances at dropping the higher end set pieces.
- It is common for it to take so long to find the 5th note that, by the time you do, the 1st has decayed.
- The notes are exchanged for the Librarian's Key
 via Master Cohenn's quest, called "Misplaced." The reward for that quest, the Librarian's Key, is what's used to enter the Peerless Room.
 - To enter the peerless room you must exchange the Librarian's Key for three smaller keys. This is done by dropping the Librarian's Key on the key table. The key table is found inside the house, which is found in the north western corner of Bedlam. 2 x click one of the smaller keys to teleport you and your party to the peerless room.
- The Peerless, the Monstrous Interred Grizzle, is of moderate difficulty. Like its younger cousins found at the Palace of Paroxysmus and at the Bedlam Crypt Champ Spawn (see below) it destroys equipment with an "infernal ooze" (Does massive damage to equipment until its durability is in the single digits, then does normal equipment damage.)
- Mages should rely upon Earthquake spells and summoned Earth Elementals. Dexers can fight it, but it is very difficult and involves a lot of jousting. Be sure to not charge right through the puddles of infernal ooze. You will die.
- Pets can do pretty well. Most tamers that I've seen use Cu Sidhes against it, and tend to rely upon greater heal spells rather than the Vet skill. This is probably because standing next to the pet and healing it from there is a very good way to get hit by the infernal ooze and die.
- In the way of special loot, the Grizzle spawns the Grizzled Mare (a Hellsteed that bonds to you instantly), the grizzled bones (See Rare Ingredients), the Tombstone of the Damned (See Named and Peerless Loot), and a special set of bone armor: the grizzled set.
Information on the Bedlam Crypt Champ Spawn
Level 1: plague spawn, boglings
Level 2: plague beasts, bog things
level 3: plague beast lords, interred grizzles (same that spawn in the Palace of Paroxysmus)
level 4: fetid essences (same that spawn with the Prism of Light Peerless), "pestilant bandages" (new creature i think; looks very similar to a mummy, can take somewhat more damage, couldn't tell what kind of damage they do becuase we dropped them so fast)
Champ: Ilhenir the Stained.
He was lored by a member of our party:
Ilhenir the Stained 9000 Hp 1264 STR 134 Stam/ DEX 644 mana/INT
Wrestling 119.9 Tactics 119.9 Resist 120.0 Anat 117.5 Poisoning 5.4 Magery 100.0 Eval 100.0
Physically, it's kind of a paragon grizzle. Looks similar, has that equipment attack. Hits fairly hard.
14 or 15 screencaps located here from the LS group that first completed the Champ on Jan 9th, 2006:


