Difference between revisions of "Enhanced Client Custom Actions"
ArrothThaiel (Talk | contribs) (Created page with "This is a walkthrough for creating custom actions in the Ultima Online Enhanced Client. For this mod we will add an art file and make four edits in three files, which combine...") |
ArrothThaiel (Talk | contribs) |
||
| (4 intermediate revisions by the same user not shown) | |||
| Line 1: | Line 1: | ||
This is a walkthrough for creating custom actions in the Ultima Online Enhanced Client. | This is a walkthrough for creating custom actions in the Ultima Online Enhanced Client. | ||
| − | For this mod we will add an art file and make four edits in three files, which combined will add an "Exit" button to the EC crafting actions, allowing us to exit the crafting menu via keystroke or macro. | + | For this mod we will add an art file and make four edits in three data files, which combined will add an "Exit" button to the EC crafting actions, allowing us to exit the crafting menu via keystroke or macro. |
| Line 7: | Line 7: | ||
[[Enhanced Client Custom Mods |Read here]] for a walkthrough on setting up Mod directory structure. | [[Enhanced Client Custom Mods |Read here]] for a walkthrough on setting up Mod directory structure. | ||
| − | To begin creating this mod we will setup our directory structure as follows, by creating folders and copying files from the Default folder | + | To begin creating this mod we will setup our directory structure as follows, by creating folders and copying files from the Default folder. We will add Exit.dds to the Actions folder in the next step. |
| − | <gallery> | + | <gallery mode="nolines"> |
CustomActionDirectoryStructure.jpg |Custom Action Directory Structure | CustomActionDirectoryStructure.jpg |Custom Action Directory Structure | ||
</gallery> | </gallery> | ||
| − | Next, we will need new art for the Exit button | + | Next, we will need new art for the Exit button, such as this .png |
[[File:exit.png]] | [[File:exit.png]] | ||
| − | Once | + | |
| + | Once downloaded, [https://www.gimp.org/downloads GIMP's] "Export As" feature can be used to convert Exit.png to Exit.dds, the format required by the EC. Place Exit.dds into MyCustomUI>Icons>Actions. At this point, the file structure should look exactly as it does in the directory structure picture above. | ||
| Line 22: | Line 23: | ||
Now we will begin editing files to create the functionality for the Exit button. First let's tell the client we have new art by editing Icons.xml. We will add the code | Now we will begin editing files to create the functionality for the Exit button. First let's tell the client we have new art by editing Icons.xml. We will add the code | ||
| − | + | ||
| + | <Icon id="876007" texture="Icons/actions/exit.dds" name="Exit" /> | ||
| + | |||
to the "Crafting Utilities" block of the file, after the line for the Make Last button. | to the "Crafting Utilities" block of the file, after the line for the Make Last button. | ||
| − | <gallery> | + | <gallery mode="nolines"> |
CustomActionIconsXMLDefault.jpg |Icons.xml default | CustomActionIconsXMLDefault.jpg |Icons.xml default | ||
CustomActionIconsXMLModded.jpg |Icons.xml modded | CustomActionIconsXMLModded.jpg |Icons.xml modded | ||
| Line 31: | Line 34: | ||
We will now make two edits to ActionsWindow.lua, to call our new icon into the Actions menu. The first will be to function ActionsWindow.InitActionData(), ActionsWindow.ActionData section, Crafting Utilities sub-section, just after the instructions for Make Last. In this location, add the code | We will now make two edits to ActionsWindow.lua, to call our new icon into the Actions menu. The first will be to function ActionsWindow.InitActionData(), ActionsWindow.ActionData section, Crafting Utilities sub-section, just after the instructions for Make Last. In this location, add the code | ||
| − | + | ActionsWindow.ActionData[6007] = { type=SystemData.UserAction.TYPE_SPEECH_USER_COMMAND, inActionWindow=true, iconId=876007, detailString=L"Close the crafting menu.", nameString=L"Exit", callback=L"script Actions.Exit()" } | |
| − | <gallery> | + | <gallery mode="nolines"> |
CustomActionActionsWindowDataDefault.jpg |ActionData Default | CustomActionActionsWindowDataDefault.jpg |ActionData Default | ||
CustomActionActionsWindowDataModded.jpg |ActionData Modded | CustomActionActionsWindowDataModded.jpg |ActionData Modded | ||
| Line 39: | Line 42: | ||
The second edit to ActionsWindow.lua will also be to function ActionsWindow.InitActionData(), this time to the .Groups[23] section. Here we will add ", 6007" to the end of the list. You must remember the comma to separate 6006, 6007. The entire line of code will look like this before modding | The second edit to ActionsWindow.lua will also be to function ActionsWindow.InitActionData(), this time to the .Groups[23] section. Here we will add ", 6007" to the end of the list. You must remember the comma to separate 6006, 6007. The entire line of code will look like this before modding | ||
| − | + | ActionsWindow.Groups[23] = { nameString=GetStringFromTid(1155372), index={ 6000, 6001, 6002, 6003, 6004, 6005, 6006} } | |
| − | + | ||
and like this after modding | and like this after modding | ||
| − | + | ActionsWindow.Groups[23] = { nameString=GetStringFromTid(1155372), index={ 6000, 6001, 6002, 6003, 6004, 6005, 6006, 6007 } } | |
| − | <gallery> | + | <gallery mode="nolines"> |
CustomActionActionsWindowGroupDefault.jpg |Groups Default | CustomActionActionsWindowGroupDefault.jpg |Groups Default | ||
CustomActionActionsWindowGroupModded.jpg |Groups Modded | CustomActionActionsWindowGroupModded.jpg |Groups Modded | ||
| Line 50: | Line 52: | ||
We will make our fourth and final code edit to the file Actions.lua. This will install the functionality so that the Exit button will know what to do when we click on it. At the end of Actions.lua, after the function for Make Last, add the following code | We will make our fourth and final code edit to the file Actions.lua. This will install the functionality so that the Exit button will know what to do when we click on it. At the end of Actions.lua, after the function for Make Last, add the following code | ||
| − | + | function Actions.Exit() | |
| − | + | local gumpID = 460 | |
| − | + | if GumpData.Gumps[gumpID].windowName and DoesWindowNameExist(GumpData.Gumps[gumpID].windowName) then | |
| − | + | local windowName = GumpData.Gumps[gumpID].windowName | |
| − | + | DestroyWindow(GumpData.Gumps[gumpID].windowName) | |
| − | + | GumpsParsing.ParsedGumps[gumpID] = nil | |
| − | + | GumpsParsing.ToShow[gumpID] = nil | |
| − | + | GenericGump.GumpsList[windowName] = nil | |
| − | + | else | |
| − | + | GumpsParsing.ParsedGumps[gumpID] = nil | |
| − | + | GumpsParsing.ToShow[gumpID] = nil | |
| − | + | GenericGump.GumpsList[windowName] = nil | |
| − | + | ||
end | end | ||
| − | <gallery> | + | end |
| + | <gallery mode="nolines"> | ||
CustomActionActionsDefault.jpg |Actions Default | CustomActionActionsDefault.jpg |Actions Default | ||
CustomActionActionsModded.jpg |Actions Modded | CustomActionActionsModded.jpg |Actions Modded | ||
| Line 71: | Line 73: | ||
That's it. We are finished with editing. Remember to save your file(s) and select MyCustomUI at login. Once in game, open Menu>Actions and the new Exit button will be available for use, just as any other button. | That's it. We are finished with editing. Remember to save your file(s) and select MyCustomUI at login. Once in game, open Menu>Actions and the new Exit button will be available for use, just as any other button. | ||
| − | <gallery> | + | <gallery mode="nolines"> |
CustomActionComplete.jpg | CustomActionComplete.jpg | ||
</gallery> | </gallery> | ||
Latest revision as of 20:30, 1 March 2026
This is a walkthrough for creating custom actions in the Ultima Online Enhanced Client.
For this mod we will add an art file and make four edits in three data files, which combined will add an "Exit" button to the EC crafting actions, allowing us to exit the crafting menu via keystroke or macro.
Read here for a walkthrough on setting up Mod directory structure.
To begin creating this mod we will setup our directory structure as follows, by creating folders and copying files from the Default folder. We will add Exit.dds to the Actions folder in the next step.
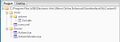
Custom Action Directory Structure
Next, we will need new art for the Exit button, such as this .png

Once downloaded, GIMP's "Export As" feature can be used to convert Exit.png to Exit.dds, the format required by the EC. Place Exit.dds into MyCustomUI>Icons>Actions. At this point, the file structure should look exactly as it does in the directory structure picture above.
Now we will begin editing files to create the functionality for the Exit button. First let's tell the client we have new art by editing Icons.xml. We will add the code
<Icon id="876007" texture="Icons/actions/exit.dds" name="Exit" />
to the "Crafting Utilities" block of the file, after the line for the Make Last button.

Icons.xml default
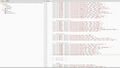
Icons.xml modded


We will now make two edits to ActionsWindow.lua, to call our new icon into the Actions menu. The first will be to function ActionsWindow.InitActionData(), ActionsWindow.ActionData section, Crafting Utilities sub-section, just after the instructions for Make Last. In this location, add the code
ActionsWindow.ActionData[6007] = { type=SystemData.UserAction.TYPE_SPEECH_USER_COMMAND, inActionWindow=true, iconId=876007, detailString=L"Close the crafting menu.", nameString=L"Exit", callback=L"script Actions.Exit()" }

ActionData Default
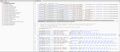
ActionData Modded


The second edit to ActionsWindow.lua will also be to function ActionsWindow.InitActionData(), this time to the .Groups[23] section. Here we will add ", 6007" to the end of the list. You must remember the comma to separate 6006, 6007. The entire line of code will look like this before modding
ActionsWindow.Groups[23] = { nameString=GetStringFromTid(1155372), index={ 6000, 6001, 6002, 6003, 6004, 6005, 6006} }
and like this after modding
ActionsWindow.Groups[23] = { nameString=GetStringFromTid(1155372), index={ 6000, 6001, 6002, 6003, 6004, 6005, 6006, 6007 } }
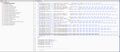
Groups Default
Groups Modded


We will make our fourth and final code edit to the file Actions.lua. This will install the functionality so that the Exit button will know what to do when we click on it. At the end of Actions.lua, after the function for Make Last, add the following code
function Actions.Exit()
 local gumpID = 460
  if GumpData.Gumps[gumpID].windowName and DoesWindowNameExist(GumpData.Gumps[gumpID].windowName) then
   local windowName = GumpData.Gumps[gumpID].windowName
   DestroyWindow(GumpData.Gumps[gumpID].windowName)
   GumpsParsing.ParsedGumps[gumpID] = nil
   GumpsParsing.ToShow[gumpID] = nil
   GenericGump.GumpsList[windowName] = nil
  else
   GumpsParsing.ParsedGumps[gumpID] = nil
   GumpsParsing.ToShow[gumpID] = nil
   GenericGump.GumpsList[windowName] = nil
  end
end

Actions Default

Actions Modded


That's it. We are finished with editing. Remember to save your file(s) and select MyCustomUI at login. Once in game, open Menu>Actions and the new Exit button will be available for use, just as any other button.

If you would like to add the Exit button to your available macro icons, read here.
With this information you should now be able to create all kinds of Actions and organize them as you see fit.
Enjoy!