Experimental Room
The Experimental Room is the location of the "Colored Room" Puzzle. Reaching the Experimental Room is a multi-step process, and this entry will not only detail how to get there, but provide the three most common strategies for "solving" the puzzle within.
Contents
Starting Out: The Puzzle Room
Before you reach the Experimental Room, you must first complete three puzzles which are locked inside a puzzle room shortly beyond the Fire Island entrance to the Underworld. As you enter the Underworld, make a left past Garamon, and then a right into the chamber with a book on a pedestal and a key near the north wall.Once in this room, if you double-click the book, you will receive the following instructions:
- Puzzling Invitation by Sir Wilbur
- Greetings Traveler! I would like to invite you to a little game. See this Magic Key? It will grant you access to the Puzzle Room. Be advised that once you take the key, you will have no more than 30 minutes to enter the room and solve the puzzles. If you fail, you will be expelled and all your progress will be lost! There are three puzzles chests. Two of them must be completed first to unlock the third. If successful, you will get a special item required to enter my other playground should you discover its location within the Underworld!!
Double-click the Magic Key, and you will receive a confirmation to begin the Puzzle Room Timer. When you're ready, click OK, and your time begins.
Once you have yourThere are three puzzle boxes within the Puzzle Room. The two boxes to your east and west must be solved first (you may do either one first, and the other one second), both of which contain the same style puzzle. The northern puzzle cannot be attempted until the first two puzzles are solved. Double-clicking any of the puzzle boxes will place a ![]() Puzzle Board into your backpack.
Puzzle Board into your backpack.
The First Two Puzzles
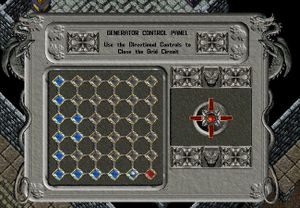
The first two puzzles are maze-style puzzles. You begin with a single blue gem in the upper-left corner, and by clicking the red, directional pad to the right, you must navigate through a hidden maze until you have safely reached the red gem in the bottom-left corner. Be sure to have a method to heal yourself with, for any false move throughout the maze will reset the puzzle to the beginning and deliver an electric shock to you. This shock will damage you over the course of a few seconds, and if you are a caster, you will be unable to heal yourself through spells during this time. Watch your health! These puzzles are timed, 600 seconds (10 minutes) each, so you've got a little time to spare to keep yourself healthy.Once you have successfully completed each of these two puzzles, you will receive ![]() a copper key which will turn to
a copper key which will turn to ![]() a bright gold key. This bright gold key allows you to attempt the third and final puzzle in the Puzzle Room.
a bright gold key. This bright gold key allows you to attempt the third and final puzzle in the Puzzle Room.
Tip for the First Two Puzzles
If you have trouble remembering where you have gone through the maze, a simple suggestion is to draw out a small, six by six grid on a handy piece of paper, and trace your path through the maze whenever you make a successful move. With ten minutes to solve the puzzle, and the puzzle resetting each time you make a false move, this will help save you some valuable time.
GM Lockpicking and the First Two Puzzles
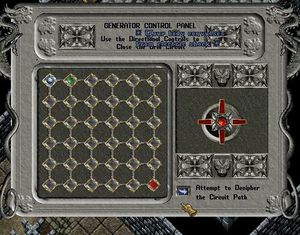
If you are a Grandmaster Lockpicker, the maze-style puzzle will appear slightly different than what everyone else will see. There is a button below the directional pad that allows you to attempt to decipher the correct path through the maze one step at a time. A green dot will appear if you are successful, indicating the correct space to move into. Note that you can still fail to decipher the correct path (and get shocked), and you still have to move the directional pad in the correct direction.The Final Puzzle
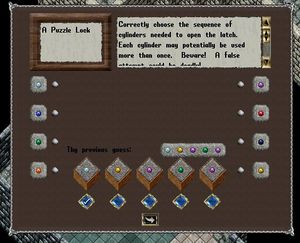
The final puzzle of the puzzle room is a "Mastermind" style puzzle where you have to determine the correct set of colors in the correct sequence in order to solve the puzzle. This is done by selecting one of the five boxes by clicking the blue gem beneath it, and then clicking the gray circle next to the color you wish to place in the box. Once you have filled all five of the boxes, click the arrow, and see how you've done.If you have failed to solve the puzzle with your solution, you will be shot by a dart, struck by a column of flame, or exposed to poison gas, so be sure to keep yourself healed, and you will definitely want to have a method to cure yourself of poison.
A failure to solve the puzzle will hurt you, but you will also be helped. A hint will appear telling you the number of "Correctly placed colors" and the number of "Used colors in wrong slots." This puzzle is basically trial and error, and there are a great many methods to go about solving it. However, keeping track of what colors you have used, where you have placed them, and paying attention to the results of each attempt will help you through.
Once you have succeeded in solving the puzzle, you will be rewarded with ![]() an Experimental Gem.
an Experimental Gem.
Note that you may complete the initial puzzles of this puzzle room and claim an Experimental Gem every two hours. This means that you could use one character to gather Experimental Gems for your other characters to use in the Experimental Room. (You may only complete the Experimental Room once every twenty-four hours per character.)
GM Lockpicking and the Final Puzzle
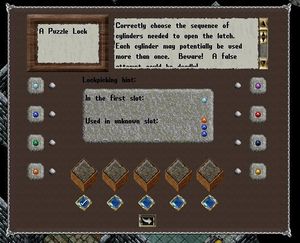
If you have GM Lockpicking, solving the final puzzle becomes a lot easier, because it will provide you with the correct color for the first of the five slots, and provide you with three of the four remaining colors. This means that you only have to figure out the correct slots for those three colors, and then determine the correct color for the leftover slot. This is a great time saver.The Experimental Room
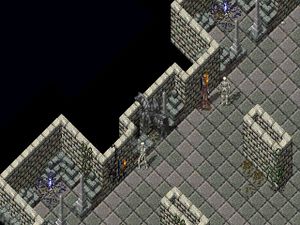
Now that you have your Experimental Gem, double-clicking it will tell you that it must be used at the entrance to the Experimental Room. Many a person have searched throughout the Underworld to no avail, roaming aimlessly, searching for the entrance without success. This is because the entrance is beyond a secret door in the room of the undead. Head northwest across the bridge from the human settlement, and when you reach the room filled with all of the minor undead, you will see two sparkly teleporters. Ignore these. The secret door is in between those two, along the west wall. Double-click the wall, and you'll be granted entrance into the secret area that houses the Experimental Room.Just outside the Experimental Room is another set of instructions:
- Read Me! by Sir Wilbur
- Hello again! This is Part II of my experiment. Beyond these doors is a challenge for those carrying an Experimental Gem. INSTRUCTIONS: Activate the Gem to start the self-destruct timer. You have 30 minutes to reach the final room. Each room has colored areas matching various states:
- White = Cold
- Pink = Warm
- Blue = Freezing
- Red = Blazing
- Green = Poison
- Orange = Cure
- Dark Green = Lethal
- Brown = Greater Cure
- Your gem's state will cycle randomly through these colors. Each time the gem shifts, you must enter the colored region that will bring your gem back to neutral state (grey). Failing when the gem reaches the extreme of any state get you expelled from the room and you will have to start over. The self-destruct timer will not reset. Once you have reached the final room, place your gem in the box to receive your reward.
Mount up (and if you don't have a mount with you, get one), approach the entrance to the Experimental Room, and double-click your Experimental Gem. Like the key to the Puzzle Room, you must confirm that you are ready to begin by clicking OK.
Your gem is now active. You may enter the Experimental Room. Double-click the metal doors and head on in.
Note, you may only activate an Experimental Gem once every 24 hours per character.
As you traverse the three colored rooms of the Experimental Room, your Experimental Gem will shift through the various colors as indicated in the instruction book outside. The colors are as follows:
Room 1
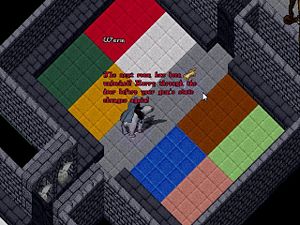
The first room of the Experimental Room contains only four colored zones, and your Experimental Gem will only turn these four colors. What you must do when your gem changes color is to head for the zone that is opposite of the color your gem currently is.- Blue/Freezing is opposite of Red/Blazing.
- White/Cold is opposite of Pink/Warm.
Your gem will turn blue, red, white, or pink, and you must get to the appropriate opposite area. It should be noted that if you fail to get a white gem to the pink area fast enough, it will turn blue. Likewise, if you fail to get a pink gem to the white area fast enough, it will turn red. Whenever this happens, you will receive a system message that indicates "The state of your gem worsens!!" Blue and red are extreme states for your gem, and if you fail to get them to an opposite area, you will be expelled back outside of the Experimental Room and will have to restart this room.
It should be noted that you can also counteract blue and red gems by using the pink or white spaces, but it will revert back to neutral slowly:
- Blue gem in pink area will become white, then neutral grey.
- Red gem in white area will become pink, then neutral grey.
You must complete approximately 5 to 8 gem changes correctly to advance to the next room (however, it may take you more than this, as it is theorized that if you slowly correct an extreme red or blue gem, it only counts as a half completion).
When you have completed the required number of gem shifts, you will receive a message that, "The next room has been unlocked! Hurry through the door before your gem's state changes again!" Head on over to the northern doors, double-click, and you're off to the second room!
Room 2
The second chamber of the Experimental Room raises the stakes a bit by adding both a light green and an orange zone. Your gem will now turn blue, red, white, pink, orange, or light green.- Blue/Freezing is still opposite of Red/Blazing.
- White/Cold is still opposite of Pink/Warm.
- Light Green/Poison is opposite of Orange/Cure.
Just like the first room, when your gem changes, you must get it into a zone that will neutralize it's current condition. A pink gem will become red if you take too long, and a white gem will become blue if you take too long. Additionally, an orange gem will become brown, and a light green gem will become dark green. Red, blue, brown, and dark green gems are in extreme states, but in this room, your gem will only start in blue or red extreme states or one of the four lesser states. Like the first room, if you fail to get an extreme state gem into an appropriate area, you will be expelled back to the entrance of the first room and have to start over again. Like the first room, you may slowly neutralize your gem back to neutral:
- Blue gem in pink area will become white, then neutral grey.
- Red gem in white area will become pink, then neutral grey.
- Brown gem in light green area will become orange, then neutral grey.
- Dark green gem in orange area will become light green, then neutral grey.
You must complete approximately 12 to 15 gem changes correctly to advance to the third (and final challenge) room, though again, it may take longer if you slowly revert a gem change back to neutral.
When you have completed the required number of changes, you will again receive a message that, "The next room has been unlocked! Hurry through the door before your gem's state changes again!" Head on over to the northern doors, double-click, and you're off to the third room!
Room 3
The third, final challenge room of the Experimental Room increases the challenge one last time by adding both a dark green and a brown zone. Your gem will now turn blue, red, white, pink, orange, light green, brown, or dark green.- Blue/Freezing is still opposite of Red/Blazing.
- White/Cold is still opposite of Pink/Warm.
- Light Green/Poison is still opposite of Orange/Cure.
- Dark Green/Lethal is opposite Brown/Greater Cure.
As in the other two rooms, if a lesser state is not handled quickly enough, it will progress to an extreme state, and red, blue, brown, and dark green remain the extreme states of the gem. Extreme states that are not brought quickly to an appropriate area will cause you to be expelled all the way back to the entrance of the first room, meaning you'll have to go back through the first two rooms just to get back here to the third. You may slowly neutralize these extreme states in lesser zones just like in other rooms:
- Blue gem in pink area will become white, then neutral grey.
- Red gem in white area will become pink, then neutral grey.
- Brown gem in light green area will become orange, then neutral grey.
- Dark green gem in orange area will become light green, then neutral grey.
You must complete approximately 15 to 20 gem changes correctly to finish the room, and make it into the prize chamber (and it may take longer if you slowly neutralize the gems). However, if you are successful, you will receive a system message indicating, "Congratulations!! The last room has been unlocked!! Hurry through to claim your reward!" Head for the doors to the north, double click, and claim your prize by either dropping your experimental gem into the gold chest, or by simply double-clicking the gold chest.
Solution Strategies
Because this particular series of rooms requires quick thought and action, several strategies have been adopted by various players in order to successfully navigate and complete the challenge. The three most popular are detailed here.
Central Position Strategy
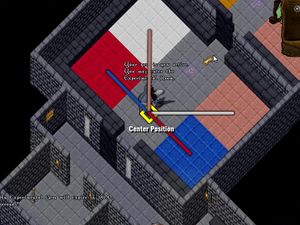
The central position strategy requires that you take a central position in each room, run to the appropriate opposite area when your gem shifts, and then run back to your central position when the gem turns neutral grey again.
In the first room, you should take a position on top of the southern of the two glowing runes. This gives you a perfect position to run east, west, northwest, or northeast as needed from that position. As soon as your gem changes state to a color, run swiftly to its opposite area, and wait for your gem to turn grey again. Once it does, rush back to the southern glowing rune and wait for the next change.- White/Cold Gem: northeast to the pink/warm area.
- Pink/Warm Gem: northwest to the white/cold area.
- Blue/Freezing Gem: west to the red/blazing area.
- Red/Blazing Gem: east to the blue/freezing area.
(The original version of this strategy indicated you should use the white/cold area to neutralize your red/blazing gem because your gem would never start as red, however, as of Publish 61, the gem may start as red/blazing, so the best strategy is now to use the blue/freezing area to neutralize it.)
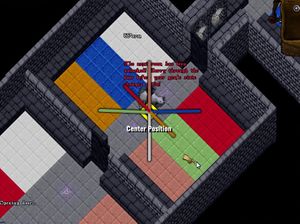
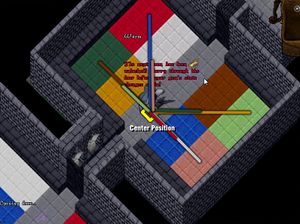
In the second room, you should take a position directly in the center of the room. This gives you a perfect position to run in any of the five directions necessary (northwest, southwest, northeast, east, southeast). Like the first room, as soon as your gem changes state to a color, run swiftly to its opposite area (which in this room is always two tiles away from the center position), and wait for your gem to turn grey again. Once it does, return to your central position and await the next change.- White/Cold Gem: southeast to the pink/warm area.
- Pink/Warm Gem: northwest to the white/cold area.
- Blue/Freezing Gem: northeast to the red/blazing area.
- Red/Blazing Gem: west to the blue/freezing area.
- Orange/Cure Gem: east to the green/poison area.
- Green/Poison Gem: southwest to the orange/cure area.
- Brown/Greater Cure Gem: run fully to the west to the dark green/lethal area.
- Green/Poison Gem: run a little to the west to the orange/cure area.
- Blue/Freezing Gem: run fully to the northwest to the red/blazing area.
- Red/Blazing Gem: run slightly east to the blue/freezing area.
- Pink/Warm Gem: run a little to the northwest to the white/cold area.
- Orange/Cure Gem: run fully to the northeast to the green/poison area.
- Dark Green/Lethal Gem: run a little to the northeast to the brown/greater cure area.
- White/Cold Gem: run fully to the east to the pink/warm area.
It is important to note in this strategy that if, in running, you miss your center position by a tile or two, don't worry about it too much, just correct it as you move to the next area. Don't get thrown off by missing that center position, but rather, just pay close attention to your new relationship to the colored areas.
Teleport Strategy
This strategy doesn't require you to be mounted (though it helps), and relies on pre-casting the Teleport spell. When the gem changes, target the area that you need to be in, and voila, you're there without running. All of the same rules apply to neutralizing the gem, of course, so pay careful attention to what area you are targeting.
As soon as you have appeared in the proper zone, quickly pre-cast Teleport again so that you're ready for the next change.
It is also helpful if, after your gem turns grey, you take a few steps toward the center/grey area of each room so that you're close to the other side of the room if you need to teleport there.
One-Sided Strategy
Prior to this strategy, this guide has not focused on another feature of the balancing of your Experimental Gem because it seems to lengthen the number of correct neutralizations it takes to get out of each room, however, this strategy may help you if you are experiencing bandwidth issues, or find that roaming the entirety of the room presents difficulties. You see, if you over-compensate for the state of your gem, it will unbalance in the other direction. You can take advantage of this in order to safely stay on one side of any given room, thus greatly reducing your need to move very far. This strategy only works for the first and third rooms, however, so the Central Position Strategy is recommended for the middle room (especially since each area is only two tiles away).
This strategy is effective mounted or using the teleport method, and lets you tighten up the first and third rooms into a smaller, more manageable space.
Using the Left/West Side
The first room, here is how to handle each initial gem state:
- Blue: Go to red; neutralized.
- Red: Go to white; gem becomes pink; stay in white; neutralized.
- White: Go to red; gem becomes pink; go to white; neutralized.
- Pink: Go to white; neutralized.
The second room, use either the central position or teleport strategies.
The third room, here is how to handle each initial gem state:
- Blue: Go to red; neutralized.
- Red: Go to white; gem becomes pink; stay in white; neutralized.
- White: Go to red; gem becomes pink; go to white; neutralized.
- Pink: Go to white; neutralized.
- Orange: Go to dark green; gem becomes light green; go to orange; neutralized.
- Light Green: Go to orange; neutralized.
- Dark Brown: Go to dark green; neutralized.
- Dark Green: Go to orange; becomes light green; stay in orange; neutralized.
Using the Right/East Side
The first room, here is how to handle each initial gem state:
- Blue: Go to pink; gem becomes white; stay in pink; neutralized.
- Red: Go to blue; neutralized.
- White: Go to pink; neutralized.
- Pink: Go to blue; gem becomes white; go to pink; neutralized.
The second room, use either the central position or teleport strategies.
The third room, here is how to handle each initial gem state:
- Blue: Go to pink; gem becomes white; stay in pink; neutralized.
- Red: Go to blue; neutralized.
- White: Go to pink; neutralized.
- Pink: Go to blue; gem becomes white; go to pink; neutralized.
- Orange: Go to green; neutralized.
- Light Green: Go to dark brown; gem becomes orange; go to light green; neutralized.
- Dark Brown: Go to light green; gem becomes orange; stay in light green; neutralized.
- Dark Green: Go to dark brown; neutralized.
Rewards
According to Sakkarah, there are currently 17 different rewards for successfully completing the Experimental Room gauntlet of puzzles. Each one has an equal chance of being rewarded, which means that with eleven varieties of flowstones and stalagmites, you will likely see them the most often. The rewards are:
-
 A two-story banner labelled "wall"
 - Three large "stalagmites"
- Four small "stalagmites"
- Two large "flowstones"
- Two small "flowstones"
-
 Hanging "chainmail leggings"
 -
 A hanging "ringmail tunic"
 -
 A "plucked chicken"
 -
 A "colorful tapestry"
 -
 An "easel" without a canvas
Changes to the Room
Publish 61 changed the Experimental Room by allowing the Experimental Gem to finally change to an initial Red/Blazing state. Prior to this publish, your gem would never begin as red, only turning red if you allowed a pink/warm gem to worsen.


